Showing posts with label rreneaouquets design team. Show all posts

Monday, July 27, 2020

Altered Paint Brush with Lighted Shadow Box by Toni

Hello to our Reneabouquet family and friends. Every month RB hosts a swap that you can participate in and it's a great way to make new creative friends and share your love for paper crafts with another. This month's swap was to create an altered paint brush, here is my take on it.
I purchased a brush from Dollar Store 3" wide which provided a nice amount of space to create on. Below I have a video tutorial so you can watch the different mixed media techniques that I used to get this effect... very easy to do.

The main focal point on the brush was the sweet RB shadow box. They are so much fun to work with and so versatile. I decided to add some fairy lights just for effect. If you haven't worked with these shadow boxes you need to get your hands on them especially with the holidays approaching. They are so much fun to create with. 
As always, RB never disappoints when it comes to their beautiful flowers and Beautiful Board. I will leave a list of all supplies used from the store below with their links for easy access. I invite you to participate in our swaps. I get so excited when I receive my package in the mail from a fellow crafter that I know has specifically created something just for me. Give it a try... Until next time, xoxo
Supplies used: 

Sunday, May 24, 2020

Queen Bee Handbag and Sketchbook DT project for Reneabouquets

Hi crafty friends,
For this month I want to share with you another fun project I made using Items from Reneabouquets and Tonic Studios dies.
I wanted to make something ultra lush, as I would be working with the Glass Wing Queen Bees from Reneabouquets. As we all know, there is only one queen in the hive, and for this queen, a beautiful handbag and sketchbook are essential!

Here is the couple with the hexagon shaped handbag covered in a beautiful handmade flower bouquet. Each handmade flower is delicately sprinkled with Gawdie Girl Pink Chunky German Glitter Glass. Grouped along the top of the handbag are also Beautiful Board Hexagon Elements Laser Cut Chipboard pieces that are embossed in gold, and scattered with Moonstone beads. I also added layers of embossed vellum resembling honeycombs, and hand-colored roses made with a Tonic Studios stamp and alcohol markers. Underneath is a piece of Ivory Wide Floral Embroidered Lace.This will surely provide a safe landing for any queen bee!
I

Along the side of the handbag, I wanted to ensure to add a handle, so I crafted one out of gold cord, and attached it to the bag with Tonic Studios die cuts that I layered with gold and black cardstock. Small black sequins top off the faux clasps. The base is also dry embossed in a honeycomb pattern, and topped with cascading hearts created with Nuvo expanding mousse and Finnabair golden nugget effect paste. The entire thing is also sprayed in gold.
Here you can see the queen bee front and center. She tops a piece of Beautiful Board Large Stackable Honey Bee Pattern that has been altered with Finnabair golden nugget effect paste,and sprinkled with pale pink microbeads. It all rests on the hexagon embossed front of the handbag.

Take a closer look at the detail in the Glass Wing Queen Bee. They are so amazing!

Now, lets look at the sketchbook! It fits comfortably inside of the handbag, but it is also made to fit the theme very nicely. On the cover, you see another grouping, only this time I used the Beautiful Board Medium Honey Bee Chipboard. To make it cohesive, I also colored it using my Nuvo alcohol markers and Nuvo Gold marker. The decorative pieces are also sprinkled with Gawdie girl pink glitter and moonstones, and they all rest on a bed of honeycomb chipboard pieces topped with vellum honeycombs, and lovely red roses. The phrase "Inspire",and the Notebook pages are all cut using Tonic Studios dies. 

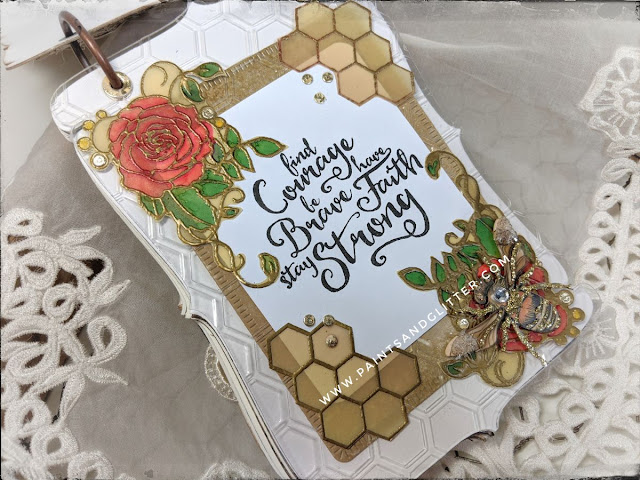
On this page, I recycled a piece of clear packaging and created a page by embossing it in a honeycomb pattern. Using a lovely stamped phrase shared by a friend, I adorned the page by framing it out with more vellum embossed pieces as well as the hand-colored roses and yet another gorgeous GlassWinged Queen Bee. In the background you can see the pages, They alternate between sketch papers and mixed media papers for a fun sketchbook.

Never forgetting the words that inspire me to create... I incorporated some scripture verses on key pages in this sketchbook. Here, I adorned the page with a piece of Beautiful Board Large Stackable Honey Bee Pattern, only this time I cut it in half to fit my page, added black embossing powder to make it shine, and sprinkled it with small moonstones. 
On this page I did the same, only here I embossed the honeycomb pattern beautiful board in gold, added moonstones and gems from my stash, and added a beautiful Proverb. 

For the last page, I decided to add a pocket. I dry embossed and stenciled the paper, then added photo corners as a decorative element. To finish, it, I added a piece of applique given to me by a sweet crafter, and altered it using gawdie girl pink glitter, pearls and gems from my stash, and a beautiful 
This concludes my project share, and I hope you enjoy it as much as I have! Please visit the links for your convenience, and don't forget to watch the video for more details. 
Thank you for stopping by, and as always, I hope that you can Be inspired, Be Blessed!
~Raquel


Sunday, October 13, 2019

"Lazy Daze" Mixed Media Layout by Toni

Hi everyone, hope you are having a spectacular month! Today I have a mixed media layout I created using several pretty pieces from Reneabouquets store. Let's get started !
I love dimension in my layouts so for the foundation I took some cardstock and ran it through a Sizzix embossing folder "wood grain" and also inked the embossing folder to give the texture an old wood appeal. Then I cut the cardstock in strips and distressed the edges. To create dimension, every other strip of cardstock I applied cardboard to the back and that raised up those strips on my layout. This provided a "shiplap" look. The photo used really provided my color palette for the layout, so I kept it pretty neutral with pops of red and black shades provided by Reneabouquets pretty mulberry flowers. All supplies are listed below. 
I did use several beautiful board pieces from Reneabouquets and they are gorgeous in their natural state, but I gave each one a little different mixed media touch. The bottom corner is the NEW Wrought Iron Panel.... gorgeous !!!!! I sponged on some green and brown paints and allowed to dry then went over it with Deco Art Crackle Varnish. For the Fancy Fall Tuckins I gave a coat of the crackle varnish and then added a bit of bronze shimmer wax here and there. 
The Clockwork gears I painted with black gesso, then crackle varnish and topped also with bronze shimmer wax. The Feather Set I embossed with bronze EP. Then to finish off the layout I included one of Reneabouquets handmade Delicate Beauty Glitter Glass Butterflies. I hope you will give your layouts a sense of dimension by trying out this simple technique... Wishing you a week plump full of goodness and "lazy daze"... hugs 

Supplies Used 
.5 Ounce Sand Chunky Glitter Glass (SOLD OUT)

Also, this month take advantage of the wonderful coupon going on for all those extra add-ons for your project with Reneabouquets Trinkets.  You can take 15% off your purchase of Reneabouquets trinkets with coupon code: TRINKETS. The code is good for the Reneabouquets.com website only.
Code must be ALL CAPS.  Coupon codes DO NOT COMBINE . Only 1 Coupon Code per order please. 

*******Also, be sure to check out the clearance section of the shop!!!! All Blue Fern Studios Chipboard is now 30% off and older paper collections are 15% off! No coupon necessary, prices reflect discount. *******