Showing posts with label micro beads. Show all posts

Friday, June 12, 2020

"Live in the Moment" - Reversed Cavnas DT project for Reneabouquets by Jenn DuBell

Hello everyone! Jenn here and today I would like to share a fun and pretty little reverse canvas with you!

For this project I have used a 5" X 7" canvas reversed. I added paper and stenciling to the frame and backing. I accented the raised stenciling with metallic waxes.
The Reneabouquets products used here are as follows:


You can find Reneabouquets here...


Reneabouquets

Reneabouquets Blog


Thanks so much for visiting the blog and viewing my post today!
Happy creating!

Be sure to take advantage of the June Coupon!

JUNE COUPON: Get 1- Package Of Reneabouquets Regular Sized Handcrafted Dragonflies (Tiny Treasures Not Included) On Any Order totaling $30.00 or more before Shipping & Taxes. Just place a Set Of Regular Sized Reneabouquets Handcrafted Dragonflies in your style choice, into your cart and use the Free Dragonfly Coupon Code: LIGHT at checkout and the cost of the Dragonfly Set will be taken off your total.
*This code is good for the Reneabouquets.com website only. *You must put the product into your cart. Code Must Be ALL CAPS Coupon Codes Do Not Combine. Only 1 Coupon Code per order please. Just use your coupon (must be ALL CAPS) in the Coupon Box at checkout and the amount will be taken off your purchase totaling the amount stated. No quantity limits. Only one coupon per order, please. Coupon Codes can not be combined. Coupon Code: LIGHT
No photo description available.

There's always something going on at ReneaBouquets! Remember to join us on Facebook at the Reneabouquets Artists With an Edge page and share all of your projects created using RB goodies!! Each month we draw a name to receive a $20 to use at
Reneabouquets!

Sunday, May 24, 2020

Queen Bee Handbag and Sketchbook DT project for Reneabouquets

Hi crafty friends,
For this month I want to share with you another fun project I made using Items from Reneabouquets and Tonic Studios dies.
I wanted to make something ultra lush, as I would be working with the Glass Wing Queen Bees from Reneabouquets. As we all know, there is only one queen in the hive, and for this queen, a beautiful handbag and sketchbook are essential!

Here is the couple with the hexagon shaped handbag covered in a beautiful handmade flower bouquet. Each handmade flower is delicately sprinkled with Gawdie Girl Pink Chunky German Glitter Glass. Grouped along the top of the handbag are also Beautiful Board Hexagon Elements Laser Cut Chipboard pieces that are embossed in gold, and scattered with Moonstone beads. I also added layers of embossed vellum resembling honeycombs, and hand-colored roses made with a Tonic Studios stamp and alcohol markers. Underneath is a piece of Ivory Wide Floral Embroidered Lace.This will surely provide a safe landing for any queen bee!
I

Along the side of the handbag, I wanted to ensure to add a handle, so I crafted one out of gold cord, and attached it to the bag with Tonic Studios die cuts that I layered with gold and black cardstock. Small black sequins top off the faux clasps. The base is also dry embossed in a honeycomb pattern, and topped with cascading hearts created with Nuvo expanding mousse and Finnabair golden nugget effect paste. The entire thing is also sprayed in gold.
Here you can see the queen bee front and center. She tops a piece of Beautiful Board Large Stackable Honey Bee Pattern that has been altered with Finnabair golden nugget effect paste,and sprinkled with pale pink microbeads. It all rests on the hexagon embossed front of the handbag.

Take a closer look at the detail in the Glass Wing Queen Bee. They are so amazing!

Now, lets look at the sketchbook! It fits comfortably inside of the handbag, but it is also made to fit the theme very nicely. On the cover, you see another grouping, only this time I used the Beautiful Board Medium Honey Bee Chipboard. To make it cohesive, I also colored it using my Nuvo alcohol markers and Nuvo Gold marker. The decorative pieces are also sprinkled with Gawdie girl pink glitter and moonstones, and they all rest on a bed of honeycomb chipboard pieces topped with vellum honeycombs, and lovely red roses. The phrase "Inspire",and the Notebook pages are all cut using Tonic Studios dies. 

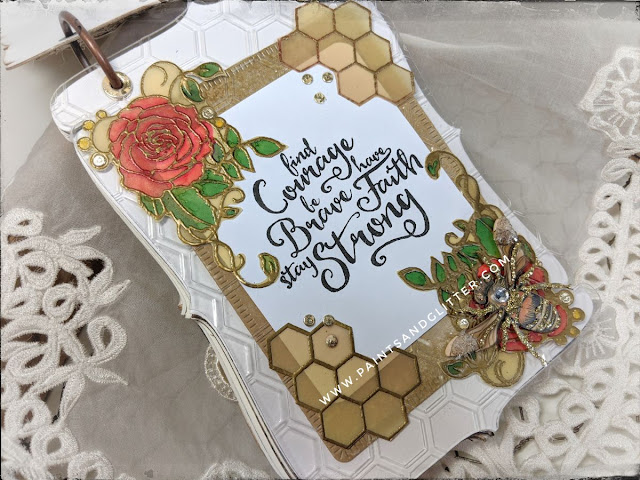
On this page, I recycled a piece of clear packaging and created a page by embossing it in a honeycomb pattern. Using a lovely stamped phrase shared by a friend, I adorned the page by framing it out with more vellum embossed pieces as well as the hand-colored roses and yet another gorgeous GlassWinged Queen Bee. In the background you can see the pages, They alternate between sketch papers and mixed media papers for a fun sketchbook.

Never forgetting the words that inspire me to create... I incorporated some scripture verses on key pages in this sketchbook. Here, I adorned the page with a piece of Beautiful Board Large Stackable Honey Bee Pattern, only this time I cut it in half to fit my page, added black embossing powder to make it shine, and sprinkled it with small moonstones
On this page I did the same, only here I embossed the honeycomb pattern beautiful board in gold, added moonstones and gems from my stash, and added a beautiful Proverb. 

For the last page, I decided to add a pocket. I dry embossed and stenciled the paper, then added photo corners as a decorative element. To finish, it, I added a piece of applique given to me by a sweet crafter, and altered it using gawdie girl pink glitter, pearls and gems from my stash, and a beautiful 
This concludes my project share, and I hope you enjoy it as much as I have! Please visit the links for your convenience, and don't forget to watch the video for more details. 
Thank you for stopping by, and as always, I hope that you can Be inspired, Be Blessed!
~Raquel


Monday, March 16, 2020

Fairy Dust Mixed Media Canvas by Lanette


Hello Everyone, 

It's Lanette here stopping in to share a tiny little mixed media canvas that I created featuring one of Reneabouquets stunning little printed fairies. This tiny little canvas came together so quickly. Once I picked up the Beautiful Chipboard words "Fairy Dust" I pictured a tiny little Fairy Dust Factory and here it is......


Beautiful Words Small Sparkle, Fairy, Dust, Moment Chipboard

Now lets take a closer look at this canvas:


No one creates butterflies like Renea and this set comes with two of these printed beauties!


Lovely Lavender Roses need I say more.....

Beautiful Board Chipboard is simply that beautiful and so easy to alter!


Moonstones, Micro Beads and lots of lovely glitter bits..


You can see how I created this little canvas start to finish here:


Now I just have to say THANK YOU to Renea and her team for the opportunity to Design with them this month.  I am having so much fun creating with all the lovey pieces from Reneabouquest!

So I hope that I have inspired you all in some little way and remember there's always something going on at ReneaBouquets! 

So HOP on over and join us on Facebook at the Reneabouquets Artists With an Edge page and share all of your projects created using RB goodies!! Each month we draw a name to receive a $20 to use at Reneabouquets!


Until Next Time, 

Thanks Again!

Lanette


Tuesday, March 5, 2019

Look For The Magic


Hi everyone! Melissa here with a design team page for Reneabouquets!  I love all the amazing things there! This photo is from free google, by A.M. Lorek. 


To make this page I applied clear gesso to Happy Accident 2 paper, by Blue Fern. I put texture paste on with a stencil, then put the layers under the photo together. I taped on cardstock underneath the image to make it stronger, below that is a lahyer of watercolors paper. At the bottom is corrugated cardboard. I had torn off most of the paper from the cardboard, and painted it with gesso. I put layers of foam core board between the layers to add dimension.


I picked out Beautiful Board (B Board), painted it with Shimmerz Paints, and topped it with Clear Rock Candy Crackle. 


To add visual interest I added micro beads, glass glitter,mica flakes,small pieces of iridescent wrap, sequins, seed beads, pearls, Swarovski crystals, glass beads,a brad,pressed flowers, moss,lichen, a 49 and Market flower, a Reneabouquets butterfly, metal from Renea,Vintaj, Prima, Tim Holtz,bling from my stash, shells, and glass pebbles. There are a few fussy cuts pieces from Prima Spring Farmhouse, and a piece of  Stamperia Alchemy paper. I used some pieces from floral picks.


I love using pressed flowers, they add delicate texture, color, and soften the even shapes of the other elements.


I dabbed on some glossy accents and then mica powder under the glass pebbles. I painted the raised areas of the texture paste with Shimmerz. 


I added Shimmerz and beads on the cardboard, and painted the edges of the layers with paint, black gesso, and swiped on gold mica powder. 
The Tim Holtz tag has Stamperia paper on it, topped with Dimensional Accents.


I dyed gauze with gold, and other pieces with a mix of green and brown. I glued on small pieces of it on the page.


I patted on gold mica powder all around on the different items, to sort of tie things together. 
Thank you so much for looking, and have a great week!


You can find Reneabouquets here...

Reneabouquets items I used:


Wednesday, February 13, 2019

ReneaBouquets Design Team Project~ Roaring into the 20's Tag Set with Brandy

Hello, fans of all that is ReneaBouquets!! Brandy here to share a new project with you!


This fun tag set features lots of the new Roaring Into The 20s, Beautiful Board Line. Inspired by Renea's love for the Art Deco movement in the 1920s.
You won't find anything like these little gems anywhere else!


I used some paint, ink, and embossing powder to color each of my Roaring Twenties Beautiful Board pieces. I love how they turned out.


Look at Miss Coral all dressed up! She is a Printed Beautiful Board work of art.


And this new Beautiful Board Flamingo... Was soooo fun to color! 


I hope this inspires you to put the traditional aside and indulge in a few new styles! Thank you stopping by!
Shop for your "Beautiful With An Edge" Products here:
https://www.Reneabouquets.com
or here:
https://www.Etsy.com/shop/Reneabouquets

Magical Miniatures Winter's Dream Double Side Printed Butterflies

Beautiful Board Medium Peacock Ornamental 6 Piece Pattern

Beautiful Board Heart Deco 13 Piece Pattern Laser Cut Chipboard

Beautiful Board Small Peacock Laser Cut Chipboard

Beautiful Board Small Heart Deco Circle Frame Laser Cut Chipboard

Printed Beautiful Board Small Coral Laser Cut Chipboard

Beautiful Board Small Peacock Clock Laser Cut Chipboard

Beautiful Board Beautiful Bits - Skeleton Leaf Laser Cut Chipboard

Beautiful Board Beautiful Bits - Rose Leaf Laser Cut Chipboard

No Hole Rose Gold Glass Microbeads

Blue & White Roses & Leaves Mulberry Paper Flowers

Sweet Daisy Lace~ White

Reneabouquets Trim-Ivory Pleated Tulle

Reneabouquets Trim-Soft Peach Lace 4 3/4 " Wide

Marie Antoinette Pearl & Rhinestone Button Set